Blog

  • Edit scheduled posts feature not found?

    I created posts over the schedule. Now I want to make changes afterwards – but I can’t find the editing function.

    1. Click on „Schedules“ (calendar).
    2. Click on the tag where the posts you want to edit are.
    3. Click on the pen icon of the post you want to edit.

  • Geplante Beiträge bearbeiten – Funktion nicht gefunden?

    Ich habe über den Zeitplan Beiträge erstellt. Jetzt möchte ich nachträglich Änderungen vornehmen – ich finde jedoch die Funktion zum Bearbeiten nicht.

    1. Klicke auf "Zeitpläne" (Kalender).
    2. Klicke in den Tag in dem die Posts sind die du bearbeiten möchtest.
    3. Klicke auf das Stiftsymbol des Beitrags, den du bearbeiten möchtest.


  • Edit posted posts feature not found?

    I want to edit a post and post it that has been posted again. Is that possible?

    Yes, that is possible.

    1. Click on Schedules (calendar)
    2. Click on Published
    3. Click on the day the post has been published before
    4. Click on the „Clone“ icon next to the post
    5. The post will be cloned and you will be redirected to the post mask.

  • Gepostete Beiträge bearbeiten – Funktion nicht gefunden?

    Ich möchte einen Beitrag bearbeiten und den noch mal posten, der schon mal gepostet wurde. Ist das möglich?

    Ja, das ist möglich.

    1. Klicke auf Zeitpläne (Kalender)
    2. Klicke auf Veröffentlicht
    3. Klicke auf den Tag in dem der Post schon mal veröffentlicht wurde
    4. Klicke auf das "Clone" Symbol neben dem Beitrag
    5. Der Beitrag wird geklont und du wirst gleich weiter zur Beitragsmaske geleitet.


  • Teams (from PREMUIM)

    The Teams section in social posters is specifically designed to facilitate collaboration between team members. With clearly defined roles and access rights, teams can work more efficiently and better manage social media campaigns.

    13.1 What is the teams area?

    • Definition:A feature that allows you to invite team members to roll them
      assign and control their access to specific areas of the platform.
    • Main benefits:
      • Cooperation:Facilitates working on joint projects.
      • Transparency:Defined roles ensure clear responsibilities.
      • Safety:Limit access to sensitive areas to prevent abuse.

    13.2 Functions of the team area

    A. Invite team members

    • Description:Invite new members via email and add them to your social poster team.
    • Functions:
      • Invitation by email.
      • Overview of all invited members with their current status.
    • Benefits:Allows easy and fast integration of new team members.

    B. Roles and permissions

    • Description:Assign specific roles to team members to gain their access rights
      to define.
    • Available roles:
      • Administrator:Full control over all functions and settings.
      • Editor:Can create, edit and publish content.
      • Viewer:Has read access only to view content or statistics.
      • Rights granting:Share exactly the rights and menu items that your team member is allowed to edit.
    • Benefits:Ensures clear responsibilities and protects sensitive data.

    C. Assign projects

    • Description:Limit team member access to specific projects
      or customer accounts.
    • Functions:
      • Assignment of specific platforms, groups or campaigns.
      • Overview of assigned projects for each team member.
    • Benefits:Ensures team members only have access to relevant areas.

    13.4 Common use cases

    • Agency workflows:
      • An agency can create specific project groups for each client and give team members access to them.
    • Release process:
      • Posts can be created by an editor and reviewed by an administrator before going live.
    • Security management:
      • Limit temporary employees or freelancers“ access to specific projects or features.

    13.5 Benefits of teams

    • Efficiency:Facilitates collaboration by allowing team members to work specifically on tasks.
    • Control:Prevents errors and misuse through clearly defined roles and permissions.
    • Flexibility:Adapts to the needs of teams of all sizes.

    13.6 Tips for optimal use

    • Clearly define roles:Assign each team member a role that
      Tasks and responsibilities.
    • Organizing projects:Use the assignment function to get an overview of
      Keep customers or campaigns.
    • Regular review:Regularly check activity logs to
      Analyze efficiency and errors.
    • Temporary access:Only grant temporary access to freelancers or external employees.

    13.7 Frequently asked questions (FAQ)

    • How many team members can I add?
      • The maximum number depends on your social poster plan.
    • Can I change the roles of a team member?
      • Yes, roles can be customized at any time.
    • Can I restrict access to certain accounts or platforms?
      • Yes, the assignment function allows targeted access restriction.
    • What happens when a team member leaves the company?
      • You can remove the member from the team, causing all accesses immediately
        be deactivated.

    13.8 Practical examples

    • Content-Team:An editor creates the content while an administrator creates it
      Review and release.
    • An agency:Assigns and tracks specific customer projects and tracks
      their progress.
    • A start-up:Use the Teams section to give freelancers access only for specific campaigns.

    13.9 Benefits for companies

    • Agencies:Manage large teams with multiple customers efficiently.
    • E-commerce:Coordinate internal and external staff for marketing campaigns.
    • Content Creator:Work with assistants and consultants without the
      Lose control of your accounts.

    The Teams section in social posters is an indispensable tool to optimize collaboration in your team. With clearly defined roles, specific access restrictions, and a clear protocol for activities, you can ensure that projects are handled efficiently and securely.

  • Teams (ab PREMUIM)

    Der Bereich „Teams“ in Social Poster ist speziell dafür entwickelt, die Zusammenarbeit zwischen Teammitgliedern zu erleichtern. Mit klar definierten Rollen und Zugriffsrechten können Teams effizienter arbeiten und Social-Media-Kampagnen besser verwalten.

    13.1 Was ist der Teams-Bereich?

    • Definition: Eine Funktion, mit der du Teammitglieder einladen, ihnen Rollen
      zuweisen und deren Zugriff auf spezifische Bereiche der Plattform steuern kannst.
    • Hauptvorteile:
      • Zusammenarbeit: Erleichtert die Arbeit an gemeinsamen Projekten.
      • Transparenz: Definierte Rollen sorgen für klare Verantwortlichkeiten.
      • Sicherheit: Begrenze den Zugriff auf sensible Bereiche, um Missbrauch zu vermeiden.


    13.2 Funktionen des Teams-Bereichs


    A. Teammitglieder einladen

    • Beschreibung: Lade neue Mitglieder per E-Mail ein und füge sie deinem Social Poster Team hinzu.
    • Funktionen:
      • Einladung per E-Mail.
      • Übersicht aller eingeladenen Mitglieder mit ihrem aktuellen Status.
    • Nutzen: Ermöglicht eine einfache und schnelle Integration neuer Teammitglieder.


    B. Rollen und Berechtigungen
    • Beschreibung: Weise Teammitgliedern spezifische Rollen zu, um ihre Zugriffsrechte
      zu definieren.
    • Verfügbare Rollen:
      • Administrator: Volle Kontrolle über alle Funktionen und Einstellungen.
      • Editor: Kann Inhalte erstellen, bearbeiten und veröffentlichen.
      • Viewer: Hat nur lesenden Zugriff, um Inhalte oder Statistiken anzusehen.
      • Rechtevergabe: Gib genau die Rechte und Menüpunkte frei, die dein Teammitglied bearbeiten darf.
    • Nutzen: Sorgt für klare Verantwortlichkeiten und schützt sensible Daten.

    C. Projekte zuweisen

    • Beschreibung: Begrenze den Zugriff von Teammitgliedern auf bestimmte Projekte
      oder Kundenkonten.
    • Funktionen:
      • Zuweisung von spezifischen Plattformen, Gruppen oder Kampagnen.
      • Übersicht über zugewiesene Projekte für jedes Teammitglied.
    • Nutzen: Stellt sicher, dass Teammitglieder nur Zugang zu relevanten Bereichen haben.


    13.4 Häufige Anwendungsfälle

    • Agentur-Workflows:
      • Eine Agentur kann für jeden Kunden spezifische Projektgruppen erstellen und Teammitgliedern Zugriff darauf geben.
    • Freigabeprozess:
      • Beiträge können von einem Editor erstellt und von einem Administrator überprüft werden, bevor sie live gehen.
    • Sicherheitsmanagement:
      • Beschränke den Zugriff von temporären Mitarbeitern oder Freelancern auf bestimmte Projekte oder Funktionen.


    13.5 Vorteile des Teams-Bereichs

    • Effizienz: Erleichtert die Zusammenarbeit, indem Teammitglieder gezielt an Aufgaben arbeiten können.
    • Kontrolle: Verhindert Fehler und Missbrauch durch klar definierte Rollen und Berechtigungen.
    • Flexibilität: Passt sich den Anforderungen von Teams jeder Größe an.


    13.6 Tipps zur optimalen Nutzung

    • Rollen klar definieren: Weise jedem Teammitglied eine Rolle zu, die seinen
      Aufgaben und Verantwortlichkeiten entspricht.
    • Projekte organisieren: Nutze die Zuweisungsfunktion, um den Überblick über
      Kunden oder Kampagnen zu behalten.
    • Regelmäßige Überprüfung: Kontrolliere regelmäßig die Aktivitätsprotokolle, um
      Effizienz und Fehler zu analysieren.
    • Temporäre Zugriffe: Erteile Freelancern oder externen Mitarbeitern nur vorübergehenden Zugriff.


    13.7 Häufige Fragen (FAQ)

    • „Wie viele Teammitglieder kann ich hinzufügen?“
      • Die maximale Anzahl hängt von deinem Social Poster Plan ab.
    • „Kann ich die Rollen eines Teammitglieds ändern?“
      • Ja, Rollen können jederzeit angepasst werden.
    • „Kann ich den Zugriff auf bestimmte Konten oder Plattformen einschränken?“
      • Ja, die Zuweisungsfunktion ermöglicht eine gezielte Zugriffsbeschränkung.
    • „Was passiert, wenn ein Teammitglied das Unternehmen verlässt?“
      • Du kannst das Mitglied aus dem Team entfernen, wodurch alle Zugriffe sofort
        deaktiviert werden.


    13.8 Praktische Beispiele

    • Ein Content-Team: Ein Editor erstellt die Inhalte, während ein Administrator sie
      überprüft und freigibt.
    • Eine Agentur: Ordnet Teammitgliedern spezifische Kundenprojekte zu und verfolgt
      deren Fortschritt.
    • Ein Start-up: Nutzt den Teams-Bereich, um Freelancern nur für bestimmte Kampagnen Zugriff zu gewähren.


    13.9 Vorteile für Unternehmen

    • Agenturen: Verwalte große Teams mit mehreren Kunden effizient.
    • E-Commerce: Koordiniere interne und externe Mitarbeiter für Marketingkampagnen.
    • Content Creator: Arbeite mit Assistenten und Beratern zusammen, ohne die
      Kontrolle über deine Konten zu verlieren.


    Der Bereich „Teams“ in Social Poster ist ein unverzichtbares Werkzeug, um die Zusammenarbeit in deinem Team zu optimieren. Mit klar definierten Rollen, spezifischen Zugriffsbeschränkungen und einem übersichtlichen Protokoll für Aktivitäten kannst du sicherstellen, dass Projekte effizient und sicher abgewickelt werden.

  • Tools

    The Tools section in Social Posters provides you with a number of useful tools to
    Plan, organize and design your social media content more efficiently. These
    Features are designed to take your posts to the next level and give you
    to save valuable time.

    12.1 What are the tools in social posters?

    • Definition:A gathering point for various tools specially developed
      The creation, management and optimization of social media posts
      to simplify.
    • Main benefits:
      • Efficiency: Complete recurring tasks faster.
      • Organization: Keep track of texts, groups and
        Branding elements.
      • Creativity: Use tools to make content unique and professional.

    12.2 What tools are available?

    A. Text-Manager

    • Description:Save frequently used texts, such as standard hashtags,
      Call-to-action or replies, and reuse them if needed.
    • Functions:
      • Categorize texts: Create categories for different types of texts
        (e.g. for various companies or occasions such as Christmas, Black Friday, etc.).
      • Edit and update: Customize saved texts at any time.
      • Quick access: Load saved texts directly into the post editor.
      • Create high-quality in no time with our artificial intelligence
        Professional texts for your posts.
    • Benefits:Reduces the effort to insert the same texts manually over and over again.

    B. Group Manager

    • Description:Organize your social media accounts into groups to create posts
      Efficiently plan for multiple accounts simultaneously.
    • Functions:
      • Create groups: Summarize accounts for customers, projects, or campaigns.
      • Customize group names: Give meaningful names such as Christmas campaign or customer A.
      • Group post creation: Schedule posts that are published simultaneously to all accounts of a group.
    • Benefits:Saves time and ensures consistent campaigns across multiple channels.

    C. Watermarks

    • Description:Automatically add a watermark to your images and videos
      Add to protect your branding and personalize your content.
    • Functions:
      • Logo upload: Upload your company logo as PNG or JPG to use as a watermark.
      • Customization options: Flexibly adjust position, transparency and size of the watermark.
      • Platform-specific: Customize the watermark for different platforms (e.g. B. Bigger logos for Instagram).
    • Benefits:Protects your content from unauthorized use and strengthens your branding.

    12.3 Advanced functions of tools

    • Automation:
      • Automatically load saved texts or watermarks into the post editor to speed up workflow.
    • Fuses:
      • Save versions of watermarks or texts to use for different campaigns.

    12.4 Common use cases

    • Save standard answers:
      • Use Text Manager to save answers for common questions or standard captions.
    • Campaigns bundle:
      • Organize social media accounts in groups to make campaigns unified across multiple channels.
    • Brand recognition:
      • Use watermarks to make sure your images and videos can always be associated with your business.

    12.5 Benefits of tools

    • Efficiency:Automate recurring tasks to have more time for creative work.
    • Professionalism:Make sure your content is consistent and brand compliant.
    • Flexibility:Use the tools to customize content to different platforms and audiences.

    12.6 Tips for optimal use

    • Use text managers sensibly:
      • Save regularly used hashtags or call-to-action to quickly insert into posts.
    • Strategically use groups:
      • Create groups for specific campaigns or customers to schedule posts efficiently.
    • Optimize watermarks:
      • Adjust the transparency and position of your watermark to be visible but not intrusive.
    • Test automation:
      • Combine the tools with post creation to speed up your workflow.

    12.7 Frequently asked questions (FAQ)

    • How many texts can I save in Text Manager?
      • There is no limit, you can save and categorize any number of texts.
    • Can I create multiple groups?
      • Yes, you can create as many groups as you need and manage them individually.
    • Will the watermark appear the same on all platforms?
      • The watermark is adapted to the platform. You can make separate settings for each platform.
    • Can I use watermarks for videos?
      • Yes, watermarks can be added for both images and videos.

    12.8 Practical examples

    • E-commerce shop:Uses text manager to describe product descriptions and
      Save discount codes that are used regularly.
    • Marketing agency:Organizes customer accounts in groups and plans
      Campaigns for multiple platforms simultaneously.
    • A content creator:Adds watermarks to images to protect them from theft and strengthen his brand.

    12.9 Benefits for companies

    • Agencies:Manage texts, groups and watermarks for multiple customers
      Efficient and professional.
    • E-commerce:Use saved texts and watermarks to keep content consistent
      and design brand compliant.
    • Content Creator:Stay in control of your content and increase efficiency
      your workflow.

    The Tools section in Social Posters gives you everything you need to help your
    Make content more efficient, professional and creative. With a combination of
    Text management, grouping, and branding tools can help you streamline your workflow and ensure your content is consistent and high quality.

  • Connect Xing to social posters

    How do I connect my Xing profile to social posters?

    Introduction

    Xing is one of the leading platforms for professional networking and is used by many companies and professionals for networking. With Social Poster, you can automatically post posts to your Xing profile and increase your visibility on the network.


    1. Benefits of connecting with social posters:

    ✔ Automatic posting of Xing blog items
    ✔ Unified content strategy across multiple platforms
    ✔ Time savings through automated publications
    ✔ Directly connect your social poster account to Xing

    2. Requirements

    ✅ You have an activeXing profile. .
    ✅ You are in yoursXing account logged. .
    ✅ You have the necessary information ready for the social poster form (e.g. B. blog description, language).

    Note:If you don’t have a Xing blog yet, you can set it up in your Xing profile under Posts. How we show you here.

    3. Step-by-step instructions for connection

    How to connect your Xing profile to social posters

    1 Log in to social postersand navigate toAccount Manager. .

    2 Click onAdd XingTo establish the connection.

    3 Fill in the specifications:

    Xing blog articlesGive your Xing account a name

    Description of blogA short summary of your Xing account

    Xing blog language: Choose the right language

    Select image: Upload a suitable image for your Xing account

    Save: click Save to create your URL and save everything

    4 Copy the generated URLfrom the Social Poster Account Manager. A message indicates that your URL has been saved to the clipboard.

    5 Open Xing profileand log in with your access data.


    6 Click on your name in the top rightand scroll down to the areaOther profiles on the network. .

    7 Click onAdd to addandPaste the previously copied URL from social poster. .


    Click onSaveYour Xing profile has now been successfully linked to social posters!


    4. Possible problems & solutions

    Error message: Invalid URL
    Solution:Make sure you copied the correct URL from social posters.

    The Xing connection is not saved
    Solution:Check that your Xing profile is fully filled. Xing can block incomplete profiles.

    Posts do not appear in Xing
    Solution:Make sure you have selected the correct Xing profile in the social poster.

    5. Special hints

    Xing only allows posting posts on personal profilesNot in corporate sides.

    The maximum character length for posts is 500 charactersLonger texts cannot be published.

    The connection to Xing must be kept activeIf your profile changes, it may be necessary to update the URL in social posters.

    Only text and image posts can be publishedVideos or interactive content are not supported by Xing.

    Tip:If you want to use your Xing profile for greater reach, you should post blog articles regularly and actively maintain your network.

  • Xing mit Social Poster verbinden

    Wie verbinde ich mein Xing-Profil mit Social Poster?

    Einführung

    Xing ist eine der führenden Plattformen für berufliches Networking und wird von vielen Unternehmen und Fachkräften zur Vernetzung genutzt. Mit Social Poster kannst du automatisch Beiträge in deinem Xing-Profil veröffentlichen und deine Sichtbarkeit im Netzwerk erhöhen.


    1. Vorteile der Verbindung mit Social Poster:

    ✔ Automatisches Posten von Xing-Blogartikeln
    ✔ Einheitliche Content-Strategie über mehrere Plattformen hinweg
    ✔ Zeitersparnis durch automatisierte Veröffentlichungen
    ✔ Direkte Verbindung deines Social Poster-Kontos mit Xing


    2. Voraussetzungen

    ✅ Du hast ein aktives Xing-Profil.
    ✅ Du bist in dein Xing-Konto eingeloggt.
    ✅ Du hast die notwendigen Informationen für das Social Poster Formular bereit (z. B. Blogbeschreibung, Sprache).

    Hinweis: Falls du noch keinen Xing-Blog hast, kannst du diesen in deinem Xing-Profil unter „Beiträge“ einrichten. Wie das zeigen wir dir hier.


    3. Schritt-für-Schritt-Anleitung zur Verbindung

    So verbindest du dein Xing-Profil mit Social Poster

    1️⃣ Melde dich in Social Poster an und navigiere zum Account Manager.

    2️⃣ Klicke auf „Xing hinzufügen“, um die Verbindung einzurichten.


    3️⃣ Fülle die Vorgaben aus:

    Xing-Blogartikel: Gib deinem Xing Account einen Namen

    Beschreibung des Blogs: Eine kurze Zusammenfassung deines Xing Accounts

    Xing Blogsprache: Wähle die passende Sprache

    Bild auswählen: Lade ein passendes Bild für dein Xing-Account hoch

    Speichern: klicke auf Speichern, um deine URL zu erzeugen und alles zu speichern


    4️⃣ Kopiere die generierte URL aus dem Social Poster Account Manager. Eine Meldung zeigt dir an, dass deine URL in der Zwischenablage gespeichert wurde.


    5️⃣ Öffne dein Xing-Profil und logge dich mit deinen Zugangsdaten ein.


    6️⃣ Klicke oben rechts auf deinen Namen und scrolle herunter bis zum Bereich „Weitere Profile im Netz“.


    7️⃣ Klicke auf „Hinzufügen“ und füge die zuvor kopierte URL aus Social Poster ein.


    8️⃣ Klicke auf Speichern – dein Xing-Profil wurde nun erfolgreich mit Social Poster verbunden!


    4. Mögliche Probleme & Lösungen

    Fehlermeldung: „Ungültige URL“
    Lösung: Stelle sicher, dass du die richtige URL aus Social Poster kopiert hast.

    Die Xing-Verbindung wird nicht gespeichert
    Lösung: Überprüfe, ob dein Xing-Profil vollständig ausgefüllt ist. Xing kann unvollständige Profile blockieren.

    Beiträge erscheinen nicht in Xing
    Lösung: Stelle sicher, dass du im Social Poster das richtige Xing-Profil ausgewählt hast.


    5. Spezielle Hinweise

    Xing erlaubt nur das Veröffentlichen von Beiträgen auf persönlichen Profilen, nicht in Unternehmensseiten.

    Die maximale Zeichenlänge für Beiträge beträgt 500 Zeichen – längere Texte können nicht veröffentlicht werden.

    Die Verbindung zu Xing muss aktiv gehalten werden – falls sich dein Profil ändert, kann es notwendig sein, die URL in Social Poster zu aktualisieren.

    Es können nur Text- und Bild-Posts veröffentlicht werden – Videos oder interaktive Inhalte werden von Xing nicht unterstützt.

    Tipp: Falls du dein Xing-Profil für mehr Reichweite nutzen möchtest, solltest du regelmäßig Blogartikel posten und dein Netzwerk aktiv pflegen.


  • Add Telegram channel and group

    How do I connect my Telegram channel and Telegram group to social posters?

    Introduction

    Telegram is a powerful tool for community building, support and content marketing. Social Poster lets you automatically post posts to your Telegram channel and group and keep your community active.

    1. Benefits of connecting with social posters:

    ✔ Automatic posting in your telegram
    ✔ Increased reach and better community interaction
    ✔ Planning and manage your content directly in social posters
    ✔ Time savings through automation

    2. Requirements

    Before you can connect Telegram to social posters, make sure you meet the following requirements:

    ✅ You have an activeTelegram accountand are logged in to the Telegram web app or smartphone app
    ✅ You either have an existingTelegram channel/Telegram groupOr create a new one.
    ✅ You need oneTelegram-botWhich you create through the BotFather in Telegram.
    ✅ You have to use the bot asAdminAdd to your Telegram channel and join the group as a member.

    Note:Your Telegram bot can only post in channels if it isAdministrator with post-permissionswas added.

    3. Step-by-step instructions for connection

    How to connect your Telegram channel to social posters

    Step 1: Add Telegram account to social poster

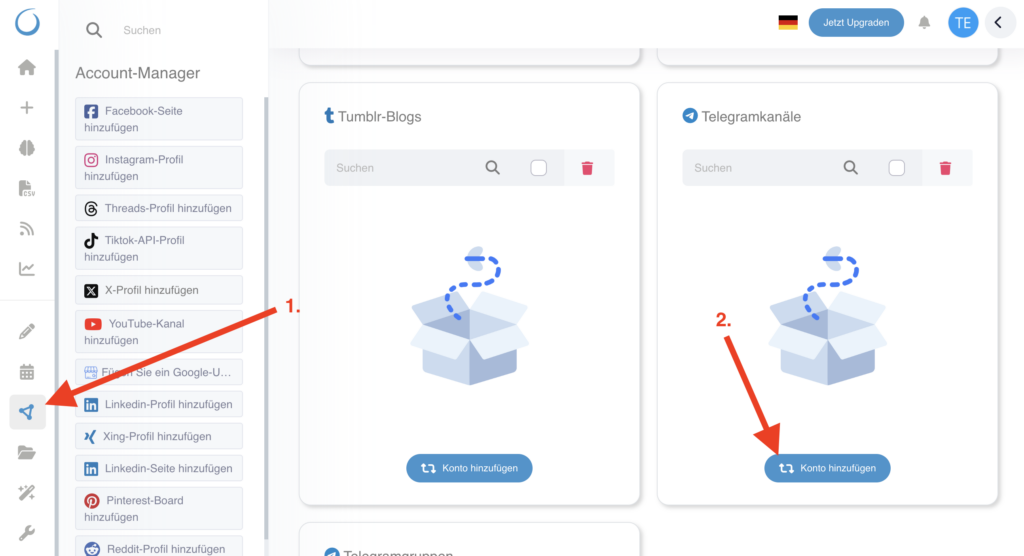
    1 Sign in to Social Posterand navigate toAccount Manager. .

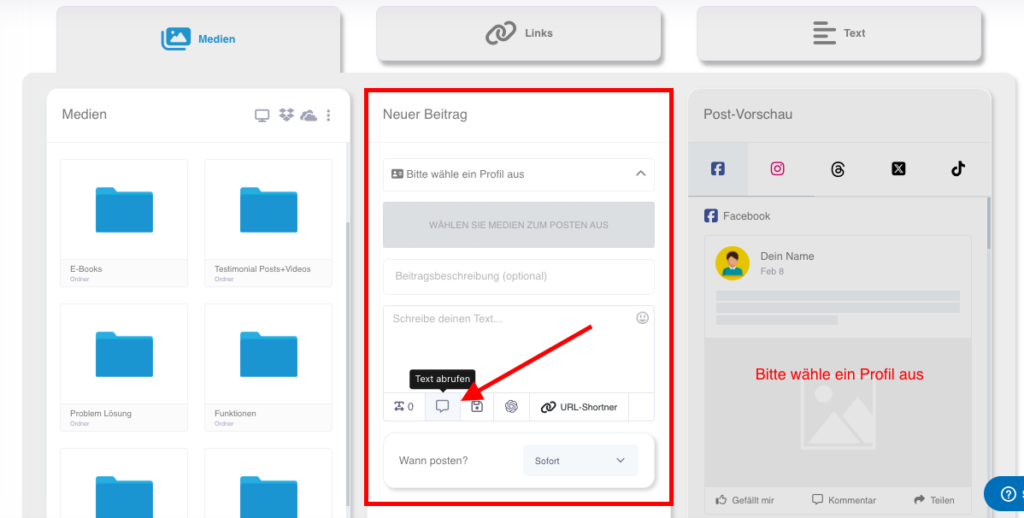
    2 Click onAdd a new accountand chooseTelegramfrom the list.

    Step 2: Log in to the Telegram webapp

    3 OpenTelegram Webin your browser or click on „Create Telegram Bot as seen above in the image above. Here the steps are listed again.

    Scan it.QR code with Telegram appon your smartphone to log in. In case you haven’t done that before.

    Step 3: Creating a Telegram bot with BotFather

    5 Open Telegramand look forBotfatherin searchbar. Choose the one with the blue hook! Or you have already been redirected to the right one via the link in the social poster.

    Click on the official botBotfatherAnd start the chat.

    Send the order/newbot, and click Enter to create a new bot.

    8: Choose oneName for your bot(e.g. B. I chose social posters).
    9: Choose oneUsername for your botwhich must end in Bot (e.g. B. I chose SocialPoster1_Bot here because my first choice SocialPoster_Bot was already awarded). Choose a unique name or username, it’s best to do with your business and you stick to the specifications. You can later display the name (not the username_bot) of the bot in the group or leave anonymous who is posting anonymous.


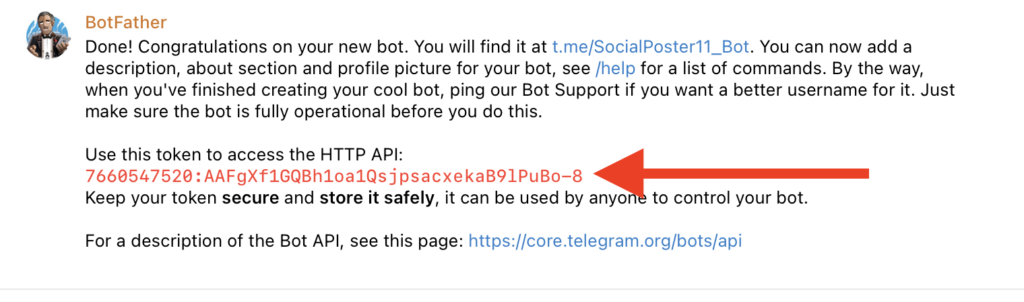
    BotFather now generates oneApi copy thisAPI tokensIt will later be inserted into social posters.

    Step 4: Create channel or use existing channel

    If you don’t have a channel yet,Create a new Telegram channelin the Telegram app or in the Telegram web app.


    Alternatively, you can use an existing channel.


    Step 5: Add the bot as admin to the channel

    Open them to open themTelegram channel settingson the smartphone or in the web app.

    „Tap onThe administratorsand click onAdd admin. .


    Looking for this.User-Namen of your bot you forgave before (in my example SocialPoster11_bot)Add him as an admin.

    Give to the botPermissions to post. .


    Step 6: Insert API tokens into social posters

    Return to BotFather chat and copy the API token if it no longer exists in your cache. Then return toSocial postersGo back and navigate toAccount Manager. .

    Click on 1agan Add Telegram. .

    1 9ŭInsert the API token of the botWhich you received from BotFather.

    Confirm the connection Your Telegram channel is now successfully linked to social posters!

    If this error message comes to you after adding, you must first post once in your new or existing channel – directly in the Telegram app or web app. An image or video with text should be posted. No matter what you write, it only needs to be posted once in the channel now. With the profile you are currently logged in to Telegram as an admin. Not with social posters, but directly in the Telegram app.

    4. Possible problems & solutions

    Error message: Invalid API token
    Solution:Make sure you have the API tokenCopied correctly from BotFatherhave.

    My bot cannot post
    Solution:Check if the botAdmin permissionsin your Telegram channel.

    Channel is not recognized in social posters
    Solution:Sometimes it takes a few minutes for Telegram to adopt the changes. Wait briefly and try again.

    5. Special hints

    With this bot you can inPost channels and groups: For the groups you must create the bot as a member.

    1. Search for the bot’s user name again and add it.
    2. Copy the created token of Telegram in the social poster at Telegram group „Enter access tokens“ and save it. Now you can also post in Telegram groups with this create bot.

    Posts are only visible to subscribers: Make sure your channel is publicly accessible or audience through the link.

    Videos and GIFs can be posted: Social Poster supports text and image posts as well as videos and GIFs.

    Tip:If you have multiple Telegram channels, you can manage them with different bots and organize them in social posters. Or add a bot to several channels.